Everybody remembers the original iPhone’s solution to avoid pocket calling people:
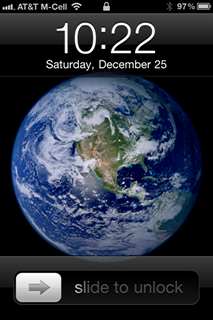
This venerable UI pattern has disappeared a while ago from our lock screens, but many apps implement it, perhaps most prominently in Amazon’s 1-click buy.
I recently implemented such an animation at work in UIKit. The StackOverflow answers typically reach for CoreAnimation on layers, and I was wondering how this would go in SwiftUI. Animations are one of the things in SwiftUI that don’t come easy to me, so it’s the perfect exercise!
AnimatableModifier
I chose to implement the effect as an AnimatableModifier. This protocol inherits from both Animatable and ViewModifier, so we implement both animatableData and func body(content: Content) -> some View.
My idea here is to take whatever view we are given inside the ViewModifier’s body function, overlay it with a gradient, and constrain it to the contents using mask():
LinearGradient(/* ... */).mask(content)
The animation then is done via animatableData: It exposes data that should be animated over. Since our animation is an endless one, I chose a simple CGFloat that grows from 0 to 1 over and over again. This float represents the horizontal percentage-based position of the gradient that is moved from left to right.
Getting the layout right
Let’s start by implementing the body function:
import SwiftUI

struct Shimmer: AnimatableModifier {

    private let gradient: Gradient

    init(sideColor: Color = Color(white: 0.25),
        middleColor: Color = .white) {
        gradient = Gradient(colors: [sideColor, middleColor, sideColor])
    }

    func body(content: Content) -> some View {
        content
            .overlay(LinearGradient(
                        gradient: gradient,
                        startPoint: .leading,
                        endPoint: .trailing))
            .mask(content)
    }
}
There’s an overlay over the content, that is again masked by the content. This way, we don’t need a GeometryReader because the overlay will exactly match the frame of content. We use a LinearGradient that currently spans the entire available space. This gradient is then masked by the content again, which stamps out the alpha channel of the content. This works nicely with text:

Moving the gradient
Currently, the gradient goes from .leading to .trailing. Let’s fix that with a position variable that we can later animate:
struct Shimmer: AnimatableModifier {

    // ...

    @State private var position: CGFloat = 0.25

    func body(content: Content) -> some View {
        content
            .overlay(LinearGradient(
                        gradient: gradient,
                        startPoint: .init(x: position - 0.2, y: 0.5),
                        endPoint: .init(x: position + 0.2, y: 0.5)))
	// ...
    }
}
This now displays the animation at 25% of its run:

Pretty nice! The gradient now covers 40% of the area (20% to the left side and 20% to the right side of the position).
Unfortunately, there are some artefacts at 0% and a 100%, where half of the gradient is still shown:


We can fix this by removing the ±0.2 at the edges of the animation:
- At 0%, we want to hide the right side of the gradient
- At 100%, we want to hide the right side of the gradient
This is a simple linear equation:
startPoint: .init(x: position - 0.2 * (1 - position), y: 0.5),
endPoint: .init(x: position + 0.2 * position, y: 0.5)))
Animating the position
To conform to the Animatable part of AnimatableModifier, we need to expose the position as animatableData:
struct Shimmer: AnimatableModifier {

    // ...

    @State private var position: CGFloat = 0
    var animatableData: CGFloat {
        get { position }
        set { position = newValue }
    }

	// ...
}
If we animate from 0 to 1, SwiftUI will be call this with values ranging from 0 to 1 for every frame. It’s like a stream of numbers: During the animation it will assume the values 0.1, 0.2, 0.3, …
The actual animation needs to be triggered in an .onAppear closure:
func body(content: Content) -> some View {
    content
        .overlay(/* ... */)
        .mask(content)
        .onAppear {
            withAnimation(Animation
                            .linear(duration: 2)
                            .delay(1)
                            .repeatForever(autoreverses: false)) {
                position = 1
            }
        }
}
Let’s dissect this:
- In
.onAppear, we set thepositionto 1 - This is wrapped in a
.withAnimation - We have a 2-second linear animation that is delayed by 1 second
- This 3-second animation is repeated forever
It’s important to use a .withAnimation here because this only animates the changes that happen inside the closure. If we opted for a .animation modifier on the view, all other changes (like frame change on device rotation) will be animated as well.
This is what the result looks like:
Final Thoughts
It’s really nice to animate things in SwiftUI. The previews help a lot: while developing this, I had multiple previews showing the animation’s progress at various stages.
But the main reason I liked it is that SwiftUI doesn’t mix metaphors: In UIKit, you could always reach down to the layer API when something (such as masking) isn’t exposed. Nothing stops you from doing that from a UIView, or a UIViewController, or another UIViewController. SwiftUI severely limits these interactions: It’s a fresh start with consistent APIs that are properly contained.
You can find the final code in this gist.